You Had Time

I’ve always been fascinated by the process more than the outcome.
A roundtrip’s destination is never as fun as the journey there.

I think that’s part of the reason I got into design as the journey to the final pieces—the exploration—is really the most illuminating part. Along the way there are hundreds of tiny little decisions that twist and contort the project. Each direction that’s taken could conceivably change the entire work drastically (The Sound of Thunder of the visual arts world). And when you pull your head up from your desk at 4am, hours before the project is to be shipped to the printer, you look at the final piece as the culmination of these infinite decisions. The creativity doesn’t lie in the product, but rather the journey.

Read more

AmEx Photo Magnets

amex.gif
delaminate.jpg
picture.jpg
magnets.jpg

God bless the kind people at American Express. Each week, sometimes 2-3 times a week, they send me a nice letter to let me know that they approve of me. They’re probably the friendliest pen pals I’ve ever had. To make things better, they even send me a Self-Addressed Bulk Postage Paid Envelope so that I can keep in touch with them from time to time. Things are pretty busy around here, so I don’t have much time to write responses. Normally, I’ll send them a pizza coupon, or a Chinese menu, or whatever else I get in the mail that day, just to let them know that I care about them as well. Certainly, it’s not as reassuring as having them tell me that they approve of me each week, but it’s the least I can do for them. After all, I’ve started to grow distinctly suspicious that they may have other pen pals in my building.

Either way, AmEx has lovingly redoubled their interest in my self-happiness by sending me little gifts with their thoughtful messages of approval. You may be familiar with the magnetic credit cards they mail out with the ominous “Your Name Here” message that cast you a daunting leer every time you get more cream for your coffee.

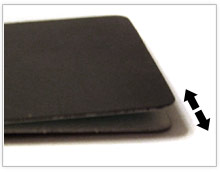
As it turns out, these magnets delaminate quite easily. And, as they’d already held various family pictures to my stainless steel fridge, I realized the master plan behind my pals at AmEx: cut out the middle man.
Step 1: Pull apart the edges of the magnet slowly until it begins to separate. You’ll notice that the adhesive continues to stick to the magnet side, rather than the plastic card side (those kids thought of everything!) This way this project requires no art supply run as you should have everything you need at home (photo, magnet, scissors) and that’s it!

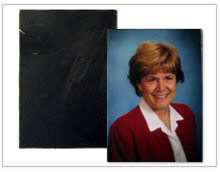
Step 2: Cut the magnet to slightly larger size than your photo. If your picture is larger than a wallet-size, you may need to crop the photo to fit the magnet.

Step 3: Adhere the magnet, pressing firmly at the corners.

Step 4: Cut the magnet flush with scissors or an X-acto Blade

Step 5: Place on fridge and lovingly adore.

That’s it! With friends like these…eh, Gary?

Category: Pix

Global Investment Project Illustrations

I’m mentioned in a previous post, here, that I was working on a number of illustrations for a 60 page printed book for a client of my company, ERA404. The book came out great and is in production now. 10,000 copies are being printed, bound in blind debossed leather and affixed with a wooden, laser-etched medallion soon to be shipped around the world. It’s by far the most intense print project I’ve ever worked on and, to make things more exciting, I was also contracted to create the below illustrations.

The book is being printed at Premiere Printing Corporation, in Plainwell, MI, and bound at John Galt Bindery in Dayton, KY. Each book is going to be wrapped in aged, wrapping paper that we’re printing at Nova Offset, here in NYC, affixed with aged mailing labels and taped with printed tape, produced through PlusPackaging.com. I hope to add some pictures to the final pieces later, either here, or in the ERA404 portfolio.

While I’m waiting for the project to complete (and the NDA to lapse), and starting the web site to supplement it, I figure I might as well throw the illustrations online for others to see. Click any of the illustrations below to pop-up a window of a larger version. Any feedback would be greatly appreciated.

Laser-Etched Medallion
Mock-up of the laser-etched medallion that will be
affixed onto the front leather cover of the book
Illustration of Big Ben and Parliament
Illustration of a Cambodian Boatman
Illustration of a Cambodian Boatman and Temple
Illustration of a Coffee Branch
Illustration of Christ the Redeemer
Illustration of Christ the Redeemer (Cristo Redentor)
in Rio de Janiero, Brazil
Illustration of Aboriginal Boomerangs and Petroglyphs
Illustration of Aboriginal Boomerangs and
Petroglyphs in Australia
Illustration of Hiking Gear
Illustration of a Sextant
Illustration of Clock Inner-workings
Illustration of the inner-workings of a clock
Illustration of the Taj Mahal
Illustration of a boatman in front of the
Taj Mahal in India
Illustration of Easter Island Moas
Illustration of the Moas (or statues) on Easter Island
Illustration of Huckleberry Finn and Jim on the Mississippi
Illustration of Mark Twain’s Jim and Huckleberry Finn
going down the Mississippi River

Illustrations for New Project

Since the beginning of the year, I’ve been working on an exciting new print project for an ERA404 client. While I can’t really discuss the nature of the project, yet, I can say that part of this work entails me completing about a dozen sketches for the final book, along with designing its 52 pages. This is the fourth time that I’ve been hired to do illustration for clients, and the most demanding. The sketches are of famous scenes and landmarks from around the world; the taj mahal on the left is just one of them. Each one is pencil-sketched, inked with thin and thick sharpies, drawn over with carbon pencils, and “water colored” with diluted black ink. They’re then scanned and overlaid on old tea-stained sheets of paper (coffee works too!).

Updated: March 27, 2007 – Illustrations Now Online!
>> See the Illustrations

Read more

WordPress Losing Divs?

If you’ve recently upgraded to WordPress 2.1 (or 2.1.2), you’ll notice that TinyMCE has stopped allowing <div> tags. This is unfortunate, because they’re the way of the future. Out with the <table>, in with the <div>.

Anyway our content management system (ERA404 CMS) uses TinyMCE, and the best way around this <div> debacle is to just swap line 25 of the tiny_mce_config.php file (located in the js/tinymce/plugins directory) with the following line (make sure it’s only one line with no break):

$valid_elements = '#p[*],-div[*],-strong/-b[*],
-em/-i[*],-font[*],-ul[*],-ol[*],-li[*],*[*]';

Et voila! Your <divs> have returned. I’d obviously recommend saving a back-up of the original config file, just in case you don’t replace the line correctly, but that should do it.